
Deal expenses capture costs incurred during a transaction — marketing, signage, vendor fees, and similar. Each expense can be split between the broker and the house, and is deducted at payment time rather than from the deal’s gross commission.
Expenses are managed in the Expenses section of the Deal Profile, directly below Broker Commissions.
Adding an Expense
- Open the Deal Profile and scroll to the Expenses section.
- Click Add Expense.
- Fill in the expense header:
| Field | Description |
|---|---|
| Expense Type | Dropdown of expense categories. Manageable under Admin > Manage Data. |
| Vendor Name | The vendor the expense is owed to. |
| Expense Description | Free text describing the expense. This description appears on the payment voucher. |
| Expense Amount | Total dollar amount of the expense. |
- Click Generate Broker Expenses to allocate the expense across brokers.
Generating Broker Expenses
Clicking Generate Broker Expenses automatically creates a line for each internal broker and each outside broker who shares commission, allocated by their commission percentage on the deal. 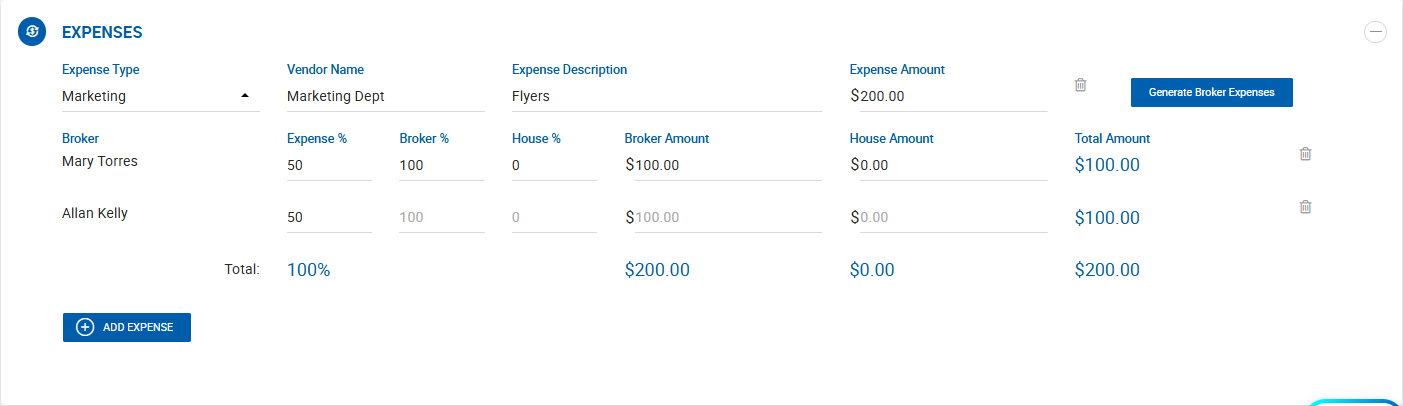
If no internal or commission-sharing outside brokers are on the deal, a modal appears: “Please add one or more internal brokers in order to generate expenses.”
Generated columns:
| Column | Description |
|---|---|
| Broker | Broker name, pulled from the Brokers and Commissions section. |
| Expense % | Share of the total expense allocated to this broker. Auto-generated from their Commission %, editable. |
| Broker % | Percentage of this broker’s share that the broker personally pays. Defaults to 100%. |
| House % | Percentage the house pays. Auto-calculated as 100 − Broker %. |
| Broker Amount | Dollar amount the broker pays. Auto-calculated, editable. |
| House Amount | Dollar amount the house pays. Auto-calculated, editable. |
| Total Amount | Broker Amount + House Amount. |
A Total row shows the sum of Expense %, Broker Amount, House Amount, and Total Amount.
Splitting Between Broker and House
By default, expenses are covered entirely by the broker — Broker % is set to 100 and House % to 0. Adjust the Broker % field to shift a portion to the house; House % recalculates automatically.
Rules:
- Split inputs are disabled for outside brokers. Their House Net is always $0, so they cannot split with the house without producing negative values.
- If an expense is entered but no split is generated, the system treats it as Broker 0% / House 100%.
- Brokers can be removed from the expense individually using the delete icon.
- Expenses are not recalculated when a receivable is received and net values change.
Who Sees What
| Role | Visible columns |
|---|---|
| Broker, Admin Assistant | Broker, Expense %, Total Amount |
| Manager, Office Admin, Admin | All columns |
House Expense % and House Amount are hidden from brokers throughout the system, as are other brokers’ expense percentages on the Deal Abstract. On the deal sidebar, brokers see only My Expenses; managers, office admins, and admins see both Broker Expenses and House Expenses.
Applying Expenses to a Payment
Expenses are deducted when a payable is paid, not before. Until the payable is paid, expense values display as $0.00 throughout accounting.
When processing a payment on a deal that has expenses, the Make Payment screen includes two additional columns and a new section.
Additional Payment Details columns:
| Column | Description |
|---|---|
| Expenses | Sum of expenses applied in this payment. Read-only. |
| Net Amount | Broker Net minus Expenses. Must be ≥ $0. Read-only. |
Expenses and Deductions section:
This section lists all expenses available to apply. Use the Broker Expense dropdown to select an expense, or click Add Broker Expense to apply additional ones. All of a broker’s expenses are applied automatically by default, but you can remove them or adjust the amounts.
| Field | Description |
|---|---|
| Expense Type, Vendor Name, Expense Description | Pulled from the Deal Profile. |
| Expense Amount | Total expense amount. |
| Broker | Payer name. |
| Broker Amount | Amount due from the broker. |
| House Amount | Amount due from the house. |
| Amount Applied | Editable. Must be ≤ Broker Amount. The full Broker Amount must be applied on the last payment. |
| Balance | Amount still unpaid. |
Rules when applying expenses:
- The applied amount is validated against Broker Net — expenses cannot exceed it.
- On the final unpaid payment for a payee, the full remaining balance must be entered.
- Outside broker expenses must be paid in full, with no associated House Expense.
- House Expense is calculated proportionally on save:
House Expense = (Paid Broker Expense ÷ Broker Expense %) × House Expense %
If a deal has no expenses, the Expenses and Deductions section and the Expense and Net Amount columns are hidden entirely.
Where Net After Expenses Appears
Deal Abstract
Deal Information shows Total House Expenses and Total Broker Expenses. The Brokers section adds Broker Expenses, Broker Net After Expenses, House Expenses, and House Net After Expenses. The Full Abstract PDF includes expense values; the External Abstract does not.
Accounting
Amount Paid and Commission Paid reflect Net after expenses. Broker Net After Expenses is available as a grid column under Accounting > Brokers, aligning the grid with the Financial Summary sidebar.
Cash Flow
Columns include Broker Expenses, House Expenses, Broker Net After Expenses, and House Net After Expenses, with monthly and running totals. The Financial Summary sidebar adds Expenses, Broker Net After Expenses, and House Net After Expenses below Broker Net. Brokers see My Net, My Net After Expenses, and the corresponding sidebar value instead of house figures. Before a payable is paid, these reflect projected values; after payment, actual values.
Dashboard
My Commission Paid YTD and House Commission Paid YTD reflect net minus expenses, based on paid values only. Broker Net and House Net widgets continue to show the original, undeducted figures.
Broker Profile
Agent Commission Paid shows net after expenses; Agent Net shows the original undeducted value. Broker users additionally see My Expenses, My Net After Expenses, and the Agent Net After Expenses sidebar value.
Payment Vouchers
The first grid adds Net After Expenses next to Broker Net. The Payment Details section adds Expenses Paid next to Amount Paid, along with the expense description.
Commissions Report
- Broker Format — adds Net After Expenses. Commission Paid includes net after expenses where expenses exist.
- Company Format — adds Broker Expenses, House Expenses, Broker Net After Expenses, and House Net After Expenses. Outside Commission Paid includes net after expenses where applicable.
Editing Expenses on a Closed Deal
Expenses can be edited on a closed deal. When saved, accounting regenerates or updates automatically — only the modified expense is regenerated, not the entire set.